
On-Site SEO is one of the most important aspects of any SEO Campaign. Any SEO Campaign can be grouped under two sections: On-Site SEO and Off-Site SEO.
On-Site SEO is described as the process of optimizing your site for users as well as search engines.
Hereunder, we have discussed On-Site SEO techniques and best recommendations that any webmaster should follow.
It’s an On-Site SEO Practical Guide that explores both basic as well as advanced techniques for implementing On-Site SEO for your website or blog.
So, if you want to be successful in the online world (with your website or blog), then you need to implement these On-Site SEO techniques religiously for your blog or website. It will help you to gain high rankings in the search results and drive a large volume of traffic from the search engines, including Google.

Table of Contents
What is On-Site SEO?
On-Site SEO is the process of optimizing the elements on a website to rank it higher on search results and gain more relevant traffic from search engines.
On-Site SEO helps search engines to understand clearly and quickly what your website is all about so that it could serve high-quality content based on a particular search query.
Moreover, On-Site SEO helps makes it easy for both search engines and users to:
- Make out what a webpage is all about
- Identify the web pages that are relevant to a search query (particular keyword or set of keywords)
- Identify web pages that are worthy of ranking well on a search engine results page (SERP).
As search engines become exponentially more sophisticated, On-Site SEO has surpassed the boundaries of keyword repetition or placement.
Now, it also involves optimizing non-keyword elements such as website load speed, mobile friendliness, Page URL structure, Page Metadata, and plenty more elements.
So, On-Site SEO does not simply aim to optimize your website for search engines; it also endeavors towards creating a better user experience for your online visitors.
On-Site SEO caters to technical as well as non-technical aspects of a website leading to improve the overall usability of a web page with on-site optimization. It calls for making both Texts as well as HTML based changes.
The need for On-Site SEO has assumed great importance these days as search engines have begun to focus more on quality and relevancy than ever before.
So, it’s in your best interest to adapt and implement On-Site SEO techniques for improving overall user experience and gaining better rankings on SERP, thereby increasing the volume of traffic to your website or blog.
Now, let’s begin and understand the On-Site SEO Techniques so that you can implement them on your website or blog to gain better rankings on SERP and improve the user experience of your visitors.
How to do On-Site SEO?
Here are some of the most common and powerful On-Site SEO practices which every webmaster should follow.
1. Create the Perfect Robots.txt File

Implementing the perfect robots.txt file for your website is not difficult at all. Moreover, it’s a legitimate On-Site SEO technique that you can use right away. It’s also known as the robots exclusion protocol or standard.
Robots.txt file has tremendous potential for SEO juice. You just need to implement it for your website. It’s one of those methods for enhancing SEO that is not only easy to implement but also does not consume much of your time. You don’t need to be a technical expert to take advantage of robots.txt.
The robots.txt is a tiny text file that informs search engines (web robots) which pages on your site they should crawl and index. Moreover, it tells web robots which pages are not to be crawled.
There are various types of robots.txt files.
Here’s an example of a basic robots.txt file:
User-agent: *
Disallow: /
Here, “*” after the “User-agent” signifies that the robots.txt file applies to all web robots that happen to visit the website. Plus, the “/” after “Disallow” tells the web robots not to visit any pages on the site.
The search engine bots have a crawl rate limit. So, if you have many pages on your website, it will take a while to crawl them, which could lead to a negative effect on your rankings.
So, you need to ensure that the Googlebot (web robots or search engines bots) spend the crawl budget on your site in the best possible way. You should help Googlebot in crawling your most valuable pages.
It means that if you create the perfect robots.txt file, you can make sure that the search engine bots (particularly Googlebot) avoid the unnecessary pages on your website.
So, with the perfect robots.txt file, you can tell search engine bots to crawl only your most useful content, thereby utilizing the crawl budget most wisely.
That’s where robots.txt file becomes so important in the SEO context.
You can have a view at your robots.txt file by typing the basic URL of the site in the browser’s address (search) bar followed by /robots.txt at the end.
In case the website lacks the robots.txt file, it will return an empty file or 404 errors. If you have a robots.txt file, you need to locate it in your site’s root directory. Here, you will get the editable version of your robots.txt file.
Creating a perfect robots.txt file calls for optimizing the robots.txt file of your website. It essentially depends on the content of your website. You should focus your efforts on maximizing search engines’ crawl budget.
So, you should ensure that the search engines bots don’t crawl parts of your website that are not displayed to the public. For example, you can disallow the login page.
Similarly, you can prevent bots from crawling specific pages on your site. So, if you want to disallow a certain page on your website (you want to instruct the bots not to crawl a certain page): http://www.yourwebsite.com/page/
You have to key in the following command on your robots.txt file: Disallow: /page/
Moreover, if you want that the page doesn’t end up in the index, you should use the noindex directive together with the disallow directive.
So, if you don’t want to index your thank you pages, then you can use the disallow directive as well as the noindex directive, like this:
Disallow: /thank-you/
Noindex: /thank-you/
Now, this page will not show up in the SERPs.
Lastly, there’s the nofollow directive. It instructs web robots not to crawl the links on a page. However, the nofollow directive is not a part of the robots.txt file. You need to access the source code of your page and make the changes between the <head> tags. You require pasting the following line of code between the <head> tags as:
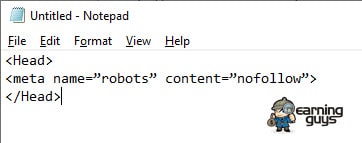
One can even add the noindex directives together with the nofollow directives by using this line of code:
<meta name=”robots” content=”noindex,nofollow”>
Now, the web robots will have both the directives to implement.
Finally, you need to test your robots.txt file to make sure everything is working the right way. You can use the free robots.txt tester provided with the Google Webmaster Tools.
If the robots.txt file is valid, you can upload it to your root directory. Armed with a perfect robots.txt file, you are well on your way to experience an improvement in your search visibility.
You can use our free Robots.txt Generator which will help you generate Robots.txt file in a minute.
2. Fix Duplicate Content Issue

Duplicate content is defined as substantive blocks of content within or across domains that completely match with other content or are much similar to them. So, Duplicate content is that piece of the same content that is found at more than one web address on the Internet.
Duplicate content is one of the most graving SEO issues affecting websites. According to research studies conducted by SEMRush, as much as 50% of analyzed websites are plagued with duplicate content issues.
Duplicate content holds the chances of impacting search engine rankings. So, it means that you can’t turn a blind eye on duplicate content.
If you have duplicate content on your website, search engines cannot make out which pages to rank in SERPs for query results. Plus, these pages may start to compete with each other.
You cannot choose which page you want to rank for in SERPs. Your rankings will take a negative toll, and you will lose a substantial amount of traffic.
It drastically affects the visibility of each of the duplicates on the search results. Further up, with duplicate content, the link equity gets diluted as they need to choose between the duplicates.
The link juice gets spread among the duplicates as the inbound links are pointed to multiple pieces of duplicate content instead of pointing to one single piece of content.
With duplicate content, the search visibility takes a drastic dip on the SERPs.
You can use Google to detect duplicate content on your website. You need to take the piece of content from your site and paste it in “quotes” as a search query on Google.
Google will show you how many pages contain that piece of content in its index of the web.
Tools such as Copyscape can be used to find duplicate content “ratio” for two selections of text.
Fixing duplicate content issues calls for identifying which of the duplicates is the correct one out there. Whenever you find duplicate content at multiple URLs, you should canonicalize it for search engines.
There are three primary ways to achieve this: Using 301 redirect, Rel=canonical attribute, and with the parameter handling tool in Google Search Console.
- 301 redirect
Using 301 redirects is probably the best technique for combating the duplicate content issue on your website. So, you have to set up a 301 redirect in the duplicate page and point it to the original content page.
This way, you will stop multiple pages (with duplicate content) to compete with each other for rankings on search engine results. It will help you to create a strong relevancy and popularity signal. So, the original content page will get a positive boost in the search engine rankings.
- Use Rel = “canonical” attribute
Another effective way to deal with the duplicate content issue is by using the rel=canonical attribute. The attribute allows you to specify that a given web page is a copy of a specified URL.
It tells the search engines to apply all the links power, content metrics, and rankings to the specified URL instead to the web page that is a copy of the original content as designated with that URL.
The rel= “canonical” attribute is used in the HTML head of a web page and takes the following form:
<head>
…….. (Other code that is placed in the HTML head of your document) …………..
<link href = “URL of Original Page” rel = “canonical” />
………. (Other code that is placed in the HTML head of your document) …………..
</head>
This rel=canonical attribute is added to the HTML head of each duplicate version of your content. It carries the link to the original page.
The rel=canonical attribute is easy to implement as it is implemented at the page level instead of the server level. It roughly passes the same amount of link equity as you have by using a 301 redirect.
- Parameter handling in Google Search Console
With Google Search Console, you can specify the preferred domain of your site (such as http://yourwebsite.com instead of http://www.yourwebsite.com). So, it allows parameter handling. You can specify whether Googlebot should be crawling various URL parameters differently.
This helps to handle duplicate content issues. However, the changes work only for Google. The rules you put in Google Search Console will not work for Bing or other search engines. You also need to set the rules using the webmaster tools for other search engines.
CMS like WordPress can create a lot of duplicate content through tags, category, etc. using any good SEO plugin like Yoast SEO; you can solve this problem.
3. Create XML Sitemap for SEO

XML Sitemap helps Google and other search engines to understand the structure of your website when crawling easily. XML Sitemap informs search engines what pages on your website are available for crawling. So, by using XML Sitemap for your website, you can improve your rankings in search engine results. In short, XML Sitemap helps to improve your SEO.
XML Sitemap can be understood as URL inclusion protocols that advise search engines on what to crawl in your website. It’s opposite to robots.txt files which are exclusion protocols and tell search engines what not to crawl.
XML Sitemap turns out to highly useful in scenarios when you have:
- A complicated structured website with many internal links
- You have a new website with a few external links
- Your site has archived content
- When you frequently add new pages to your website
- You have an eCommerce website with dynamic pages
With XML Sitemap, you can pass more data to search engines. It lists all URLs from your site. You can have a “priority” tag on your XML Sitemap and tell search engines which pages on your website are the most important. So, the search engine bots (web crawlers) will focus on these priority pages.
You can even include two other optional tags – “lastmod” and “changefreq” – to pass extra data to search engines helping them to crawl your website. The “lastmod” tag tells search engines when a page last changed. The “changefreq” tag tells search engines how often a web page is likely to change.
There are different types of XML Sitemaps such as:
- XML Sitemap Index: It’s essentially a sitemap for sitemaps. It is named as sitemap-index.xml. XML sitemaps have a limit of 50,000 URLs (Max) and an uncompressed file size limit of 50MB. So, when you exceed either of these limits, you need to split your URLs across multiple XML Sitemaps which can be combined into a single XML Sitemap Index file. You also need to submit your Sitemap Index to Google Search Console and other Webmaster Tools.
- Google News Sitemap: This sitemap is used by sites that are registered with Google News.
- XML Image Sitemap: It improves the indexation of image content.
- Mobile Sitemap: These are for feature phone pages.
- HTML Sitemap: It assists human users to find content on your website.
- Dynamic XML Sitemap: Your server automatically updates these and reflect website changes as they occur.
Creating an XML Sitemap can be very easy as most website content management systems offer support for automatically creating a one for your site.
Here, we share the essential points that you should remember while creating an XML Sitemap:
- You should begin your Sitemap with an opening tag and end with a closing tag
- Specify the namespace within the tag
- Include an entry for each URL. It’s called as a parent XML tag
- Have a child entry for each of the parent tag
- Use UTF-8 encoding
You need to verify your XML Sitemap with Google Webmaster Tool. If you have a small website, you can use XML Sitemap Generator for creating your sitemap. The XML sitemap needs to be uploaded to the root of your domain: www.yourwebsite.com/sitemap.xml
WordPress users can use plugins such as WordPress SEO by Yoast for easily creating your sitemap, or you can use our Free XML Sitemap Generator tool and create Sitemap easily and quickly.
4. WWW and Non-WWW Versions for your site

Setting up your preferred domain (www and non-www versions for your website) is one of the most important On-Site SEO techniques that can help you to enhance the power of your link building efforts.
You must know that Google perceived http://yourwebsite.com and http://www.yourwebsite.com as two different web pages and regarded as duplicate content. So, you must set your preferred domain (www or non-www) which will enable Google to know which domain they should be crawling and indexing.
When you do not set your preferred domain, Google may make out that you are linking to two different web pages, thereby hampering your link building efforts.
So, links point to your website with both www and non-www versions of the URL.
However, once you set your preferred domain, you make it explicitly clear to search engines (Google) which version (www or non-www) of your site you want to index in the search results.
- Setting up your Preferred Domain
You need to open up your .htaccess file and include the following code. You must remember to change Yourwebsite.com (used hereunder) to your actual domain.
When you want to set non-www as your preferred domain
RewriteEngine On
RewriteCond %{HTTP_HOST} ^www.Yourwebsite.com$ [NC]
RewriteRule ^(.*)$ http://Yourwebsite.com/$1 [R=301,L]
When you want to set www as your preferred domain
RewriteEngine On
RewriteCond %{HTTP_HOST} !^(.*)\.Yourwebsite\.com$ [NC]
RewriteRule ^(.*)$ http://www.Yourwebsite.com/$1 [R=301,L]
You can even use Google Webmaster Tools for setting up your preferred domain. Here, you need to click on “Settings” right below “Configuration.” You will need to access the “Preferred Domain” option and can set the domain you prefer.
5. HTTPS and SEO

You must know that HTTPS stands out as a ranking factor with Google. However, the ranking effect is very subtle and small, as of now. As pointed out by Google’s John Mueller, “It’s not something where you will see a rise in rankings just for going to https.” He did mention that HTTPS will become a strong ranking factor shortly.
So, it makes sense to switch your website to HTTPS.
Here are some key pointers which indicate the advantages with HTTPS websites:
- 84% of users go on to abandon a purchase if the data is sent over an insecure connection
- HTTPS websites load much quickly as compared to HTTP sites. So, HTTPS websites offer enhanced user experience and are likely to rank better in search results
- Google is moving towards a fully secure web
- About 40% of Google’s Page-One Organic listings are now HTTPS
- HTTPS has been incorporated as a ranking signal in Google’s search algorithms ever since 2014
- Google Chrome marks HTTP sites as insecure
- HTTPS prevents intruders and hackers from tampering the communication between users and your website
- HTTPS has become a requirement with many new browser features such as Progressive Web Apps
So, you see that HTTPS websites stand to gain many advantages over HTTP sites. Moreover, with Google favoring HTTPS as a ranking factor, making your site secured with HTTPS favors your SEO efforts.
After moving your site to HTTPS, make sure to fix these issues:
Mixed Content Issues when switching to HTTPS
Mixed Content Issues is one of the potential issues that can result after making the switch from HTTP to HTTPS. The Mixed content issue hurts your website SEO and user experience.
It occurs when initial HTML is loaded over a secure HTTPS connection; however, other resources (images, videos, scripts, and style sheets) are loaded with an insecure HTTP connection.
It is called “mixed content” as both HTTP and HTTPS content is loaded for displaying the same web page. However, the initial request is secure over HTTPS.
Mixed content issue signifies that although your website is using an SSL Certificate, some portion of your website content is still served over non-HTTPs URLs.
In WordPress, mixed content issue results due to incorrect HTTPS/SSL settings. You can use the SSL Insecure Content Fixer Plugin for fixing mixed content error in WordPress. The plugin offers different levels of fixes for resolving the mixed content error.
To make your site secure using HTTPS, you will need SSL Certificate which you can buy or get it for Free. You can check this post to get cheap SSL certificates: 5 Best & Cheap SSL Certificate Providers
6. Mobile SEO

You need to configure your website so that it works with multiple devices and allows search engines to understand your website better. Mobile optimization allows you to optimize your website for mobile devices enabling visitors (who access your website using their mobile devices) to get an experience optimized for the device.
So, Mobile Optimization, better known as Mobile SEO, allows you to optimize your website for different screen sizes and load times. Mobile optimization involves working with factors such as site design, site structure, page speed, and more so that mobile visitors have an awesome experience exploring your site from their mobile devices.
As mobile usage is on the increase, mobile optimization has become even more important these days.
Over 58% of all searches in Google are carried out using a mobile device. Mobile is becoming the future of search.
Moreover, Google has overhauled its algorithms to focus on mobile search. In fact, Google has made its entire algorithm, “Mobile-First.” Google has rolled out a Mobile-first index, which ranks the search results considering only the mobile version of the web page. It’s applicable even when users are searching from a desktop. So, irrespective of the device you use, Google will show you the results based on their Mobile-first index.
It means that you need to optimize your website for mobile users FIRST.
Here, we list out some of the key practices that you need to follow for implementing Mobile SEO or Mobile Optimization for your website considering Google’s move to Mobile-first Index:
- Page Speed: Page Speed happens to be one of the most important considerations for mobile users. So, you need to optimize images, minify code, apply browser caching, and reduce redirects.
- Don’t block images, JavaScript, or CSS: Gone are the days when mobile devices couldn’t support these elements on your website. Now, there’s no need to hide these elements as all the latest Smartphones support these features for a website. In fact, these elements turn out to be crucial for Google in determining whether you have a responsive website or do you have a different mobile solution.
- Site Design: Implementing mobile-friendly site design is crucial if you want your visitors to have all the fun with your website on their mobile device. So, it calls for using HTML5 instead of Flash for creating special effects. Don’t use a pop-up on your website as these can be very frustrating on a mobile device.
- Optimize Titles & Meta Descriptions: You need to cope up with less screen space when users search using their mobile device. So, you need to be as concise as possible when creating titles, Meta descriptions, and URLs.
- Optimize your content for local search: You need to standardize your name, address, phone number, and include the city as well as state name in your website’s Metadata. It will help to optimize your business for local search.
- Responsive Web Design: Use of CSS3 media queries allow you to serve the same content across mobile and desktop devices which can automatically adapt to the user’s screen size. Moreover, Google prefers responsive design.
- Dynamic Serving: You can display different content based on the user agent by using different sets of HTML and CSS. It is called dynamic serving and can be done by using the Vary HTTP header.
- Create a Separate Mobile URL: You can have a parallel site for mobile users by which you can serve custom content to your mobile visitors. The parallel mobile sites make use of an “m” sub-domain.
- Create AMP Version of your Site: As page speed is all set to become a mobile ranking factor, mobile sites with AMP (Accelerated Mobile Pages) implemented to offer you a big chance to boost your rankings and traffic.
AMP pages offer lightning-fast speed. They outperform existing mobile pages in speed. AMP makes your site load quickly on mobile devices. It optimizes mobile browsing experience for users with AMP version of your site. So, if you produce content regularly, you need to have AMP version of your site.
Implementing AMP for your WordPress site is easy. You can use WordPress AMP Plugin. It’s the official WordPress Plugin for WordPress. It will integrate AMP on all your pages and offer fully integrated AMP publishing for your WordPress website. You need to install and activate the plugin. Its core features include:
- Compatibility Tool: It enables AMP debugging and offers detailed information about validation errors.
- CSS Tree Shaking: It allows you to deal with cases when the defined CSS rules on a WordPress website exceed the CSS size limit that you get with single AMP pages.
- Gutenberg Support: Allows AMP content creation that is fully integrated with Gutenberg.
- Many Optimizations: Offers customization flexibility, better UI flows, accessibility, and more.
- Plus, plenty of more powerful features
7. Fix Internal and External Broken Links

Internal and external broken links with your website kill your SEO efforts. It usually happens when you redesign (restructure) your website or switch to a different CMS (Content Management System). Internal and external broken links occur when some of your pages are no longer available at their previous URLs.
If you have lots of internal and external broken links to your website that do not direct users to real pages, then this could seriously affect your search engine rankings. You lose rankings due to these dead links.
Internal and external broken links lead to 404 errors.
So, you need to redirect links that point to non-existent pages and manage 404 errors.
In fact, 404 errors are a web-related error that alerts a “not found” message when the browser cannot connect to the server and does not find the target page. So, 404 errors occur whenever a link you click does not point or direct you towards an active page.
For instance, you have deleted an old web page which you no longer needed, but still a lot of other pages from your site is pointing to it. If the user clicks those link, then users will get a 404 error whenever they click on that link.
Although Google recognizes 404 errors as a normal part of the web, it does say that 404 errors are generally undesirable for SEO. Your entire website can suffer due to 404 errors specific to certain pages and lose rankings in Google’s search results, thus resulting in loss of traffic.
So, you need to fix your 404 errors and address internal & external broken links issue. By fixing 404 errors on your website, you will not only improve user experience but also enhance the overall SEO of your website. So, you need to fix 404 errors from an SEO perspective.
The easiest and the most efficient way of fixing 404 errors, is to use a 301 redirect. The 301 redirect signals to the user’s browser (as well as web robots) that the content is permanently moved from one URL to another. The 301 redirect keeps the PageRank intact with your website. So, you can use the 301 redirect to lead users to the most relevant content (page) on your website.
In case you have a lot of 404 errors (it results when you have restructured your website or switched to a new CMS), and then you can solve this problem in two ways.
First, you can bulk redirect all pages to the homepage on your website. It’s a quick and simple solution.
Secondly, you can download your backlinks and go on to prioritize the links that are worth redirecting.
However, the URLs that have very few valuable links or less commercial value should be redirected to your homepage.
So, you must fix 404 errors to recover potential sales and preserve your website’s SEO.
8. Fix 500 Internal Server Errors

An HTTP status code can be understood as the Internet equivalent of a conversation that happens between a browser and the server. So, it’s a server response to a browser’s request. It’s a three-digit code that is sent as the response from the server to the browser’s request.
The HTTP status codes allow you to know whether the communication between the server and your browser are Ok, touch-and-go, or whether something has gone wrong.
Understanding the status codes help you to address site errors quickly and minimize downtime on your website.
There are different HTTP status code classes which are expressed with 1xx through 5xx.
- 1xx are used for informational responses
- 2xx show success with the server giving the expected response
- 3xx represent redirection. The request was processed, but there’s a redirect of some kind
- 4xxx are used to show client errors such as “Page not found.”
- 5xx are used for Server errors where the server failed to complete the request
The HTTP status codes have a big impact on SEO.
For instance, the HTTP Status Code 500 represents Internal Server Error. This status code indicates that there is a problem with the server. It’s a classic server error which affects the access to your site.
The 500 Internal Server Error occurs due to a server misconfiguration. It results in losing out visitors, and your link equity will be affected. Search engines such as Google prefer well-maintained sites. So, you should investigate these status codes and fix it as soon as possible to avoid a negative SEO impact on your website.
Fixing the 500 Internal Server Errors calls for auditing your site on a regular basis. So, keep an eye on your site. You can use tools such as A1 Website Analyzer, Deep Crawl, Link Redirect Trace, or even Google Search Console for identifying status codes at scale. You should undertake site migrations, or preferably use the Page Level 301 (Permanent) Redirects.
9. Fix Broken Images for SEO

Image issues can adversely affect your SEO efforts and can hamper your rankings in the search results. Images turn out to be an important part of any website, so you need to take image optimization seriously for your website. Moreover, if you have a stock image website or running a food blog, you need to work on image optimization more than if you have any other website.
So, you need to focus on fixing broken images as well as missing alt attributes. The alt attribute helps search engines to make out the subject of an image so that they can include your images in search results.
Remember that Google receives more than 1 billion page views per day for image search alone. It’s a big number by any count. So, you need to focus on optimizing images as it will help you to get regular traffic from Google image search as well as from image-based social networks like Pinterest.
Let’s begin image optimization by working with alt tags. It’s important for image search. The Alt tag helps search engines to understand what the image is all about. Alt tags provide a textual description to images, thereby helping search engines to categorize them.
So, you need to include SEO keyword phrases in your image alt tags. Images with alt tags are considered more valuable by search engines as it enhances the user experience by including necessary information, thereby enhancing search engine performance. You must add the “alt” and “title” attributes to all your important images.
Plus, you need to run an SEO audit and find out which image issues are affecting your website. You can use tools such as WebSite Auditor to crawl your website and report back any broken <img> tags. You can fix all broken images by replacing them with new ones or delete them. In case you are using WordPress, you need to edit a blog post to change the image settings.
10. Internal Linking for SEO

Internal linking is a key On-Site SEO strategy that helps search engines (like Google) to know the structure of your website. In simple words, internal links are hyperlinks that point to another page on the same website. So, internal linking helps to establish a hierarchy on your website and allows you to give more link value to your most important pages and posts on your website.
Internal linking proves a valuable source for Google and other search engines to find out the relationship between the various pages and posts on your website. So, by using internal links, Google can make out which of your posts or pages share similar subject matter. By adding internal links to a piece of content on your blog post, you help Google understand that it is related to the content on those pages to which the links have been pointed.
Moreover, Google divides the link value between all links that are found on a web page. So, the homepage of a website has the greatest link value as it has the most number of backlinks. The link value that is passed to the following page gets divided between the links that are found on the page, and so on.
It means that Google will find a new post quickly if it is linked to from the homepage. The underlying concept to be understood here is that links pass their link value on. So, more the number of links to a post, more the value it has in the eyes of Google. In fact, Google deems a post important if it has lots of valuable links.
When you use internal linking, you will increase its chances of ranking well on search engines. For instance, you should have lots of links pointing to the essential content from topically-related pages on your website. You should also add internal links to the most popular or even to the newest posts on your website.
Internal linking allows Google to understand which pages on your website hold related information about a topic. In case you use WordPress, there are WordPress Plugins that allow you to add related posts sections within your posts. However, you can also select a related post manually and place a link to that post at the bottom of your article.
With a solid internal linking strategy, you can help Google as well as your users to understand your website better, thereby increasing your chance of ranking well on search results.
11. Add your Site to Google Search Console

Adding your site to Google Search Console allows you to measure your site’s search traffic as well as performance. You can fix issues related to your website and so have a better chance to rank well in Google search results. So, Google Search Console proves a valuable tool for improving your On-Site SEO.
For instance, you can utilize its HTML Improvements feature. It is found under Search Appearance. It offers a report with a snapshot of any issues affecting your website performance. Search Console offers a record of any content that is not indexable. It also offers valuable information about any issues with your site’s Meta descriptions and title tags.
Under Google Index, there are Content Keywords. It shows the keywords that have been used in your site as well as keyword variations and significance. So, you can quickly come to know if you need more content around certain keywords, topics, and themes.
With the Sitemaps section, you can come to know all the sitemaps that you have included for your website. Its Remove URLs feature allows you to remove a URL from Google’s Index. It offers comprehensive search analytics with the site’s impressions, clicks, and position on Google Search. It even offers email alerts whenever Google identifies any issue on your site.
All in all, with Google Search Console, you can make your website shine in Google Search Results.
Conclusion
We have explored the basic as well as advanced On-Site SEO techniques that webmasters should follow for improving their search rankings and increasing organic traffic to their website. It’s a comprehensive post that endeavors to help you improve the On-Site SEO of your website.
We recommend you to implement these On-Site SEO techniques for your website and gain an advantage in search results.
We hope that this post on On-Site SEO proves a helpful guide for you in implementing On-Site SEO for your website. If you find it helpful, please share it on Facebook, Twitter, and other popular social networks. We welcome your comments. Please leave your feedback below.